고정 헤더 영역
상세 컨텐츠
본문
AT91Bootstrap
Introduction
AT91Bootstrap is a first step bootloader providing a set of algorithms to manage hardware initialization (GPIO, Clock, SDRAM, etc), to download your main application from specified FLASH media to main memory and to start it.
AT91Bootstrap은 첫번째 단계의 bootloader이다. 그것은 hardware initialization (GPIO, Clock, SDRAM, etc)을 관리하고, 특정 FLASH media에서 main memory로 main application을 download하고 그것을 시작하기 위한 algorithms의 set을 제공한다.
In the linux4SAM pre-built demo it is used to configure the hardware and to load and start the standard U-Boot bootloader, it can also be configured to start directly the linux kernel.
linux4SAM pre-built demo에서 그것은 hardware를 configure하고, standard U-Boot bootloader를 load하고 start하기위해 사용된다. 또한 직접 linux kernel을 start하도록 configure 할 수도 있다.
More information see the AT91Bootstrap application note.
추가 정보는 the AT91Bootstrap application note에 설명되어 있다.
Pre-built binaries
DataFlash
| Board | Description | Binary |
|---|---|---|
| at91sam9260ek | AT91Bootstrap binary with 2nd level application in Dataflash chip (SPI 0 CS 1) | dataflash_at91sam9260ek.bin |
| at91sam9xeek | AT91Bootstrap binary with 2nd level application in Dataflash chip (SPI 0 CS 1) | dataflash_at91sam9xeek.bin |
| at91sam9261ek | AT91Bootstrap binary with 2nd level application in Dataflash chip (SPI 0 CS 0) | dataflash_at91sam9261ek.bin |
| at91sam9263ek | AT91Bootstrap binary with 2nd level application in Dataflash card (SPI 0 CS 0) | dataflash_at91sam9263ek.bin |
| at91sam9rlek | AT91Bootstrap binary with 2nd level application in Dataflash card (SPI 0 CS 0) | dataflash_at91sam9rlek.bin |
| at91sam9g20ek | AT91Bootstrap binary with 2nd level application in Dataflash chip (SPI 0 CS 1) | dataflash_at91sam9g20ek.bin |
| at91sam9g10ek | AT91Bootstrap binary with 2nd level application in Dataflash chip (SPI 0 CS 0) | dataflash_at91sam9g10ek.bin |
| at91sam9g45ekes | ROM Code replacement 2 | |
NandFlash
| Board | Description | Binary |
|---|---|---|
| at91sam9260ek | AT91Bootstrap binary with 2nd level application in NandFlash | nandflash_at91sam9260ek.bin |
| at91sam9xeek | AT91Bootstrap binary with 2nd level application in NandFlash | nandflash_at91sam9xeek.bin |
| at91sam9261ek | AT91Bootstrap binary with 2nd level application in NandFlash | nandflash_at91sam9261ek.bin |
| at91sam9263ek | AT91Bootstrap binary with 2nd level application in NandFlash | nandflash_at91sam9263ek.bin |
| at91sam9rlek | AT91Bootstrap binary with 2nd level application in NandFlash | nandflash_at91sam9rlek.bin |
| at91sam9g20ek | AT91Bootstrap binary with 2nd level application in NandFlash | nandflash_at91sam9g20ek.bin |
| at91sam9g10ek | AT91Bootstrap binary with 2nd level application in NandFlash | nandflash_at91sam9g10ek.bin |
| at91sam9g45ekes | AT91Bootstrap binary with 2nd level application in NandFlash | nandflash_at91sam9g45ekes.bin |
| Old binaries | AT91Bootstrap directory on Linux4sam FTP |
|---|
Load AT91Bootstrap on SAM9 boards
This section describes How to load AT91Bootstrap into the boot media with SAM-BA.
이 section은 SAM-BA를 가지고 AT91Bootstrap를 boot media로 load하는 방법을 설명한다.
- Connect the USB Device Interface to your host machine using the USB Device Cable
- host machine에 USB Device Cable을 이용하여 USB Device Interface를 연결한다.
- Make sure that the chip can execute the bootROM monitor SAM-BA-boot :
- chip이 bootROM monitor SAM-BA-boot를 실행할 수 있는지 확인한다.
| AT91SAM9260-EK | AT91SAM9261-EK | AT91SAM9263-EK (RevA) |
|---|---|---|
|
|
|
| AT91SAM9XE-EK | AT91SAM9RL-EK | AT91SAM9263-EK (RevB) |
|
|
|
| AT91SAMG20-EK | AT91SAMG10-EK | AT91SAM9G45-EKES |
|
|
|
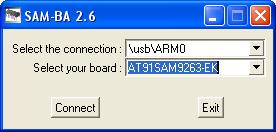
- Start SAM-BA GUI Application
- SAM-BA GUI Application을 시작한다.
- Select the the board in the drop-down menu and choose the USB Connection
- drop-down menu에서 board를 선택하고 USB connection을 선택한다.
- Eventually plug back a jumper to access the media on which u-boot must be loaded to
- 마지막으로 u-boot이 loaded되야만 하는 media에 access 하기 윟 plug back한다..
- In the main SAM-BA window :
- main SAM-BA window에서

- Choose the proper media tab (DataFlash, NandFlash, etc.) in the SAM-BA GUI interface
- Initialize the media choosing the Enable action in the Scripts rolling menu and press Execute
- Choose Send boot file, press Execute
- Select the at91bootstrap binary file and press Open ; the media is written down
- Close SAM-BA, remove the USB cable
1. SAM-BA GUI에서 알맞은 media tab(DataFlash, NandFlash, etc.)을 선택한다.
2. Script rolling menu에서 Enable action을 선택하여 media를 초기화한다. 그리고 Execute를 누른다.
3. Send boot file을 선택하고, Execute를 누른다.
4. at91bootstrap binary file을 선택하고 Open을 누른다, media는 기록(write-down)된다.
5. SAM-BA를 닫고, USB cable을 제거한다.
Boot strategies
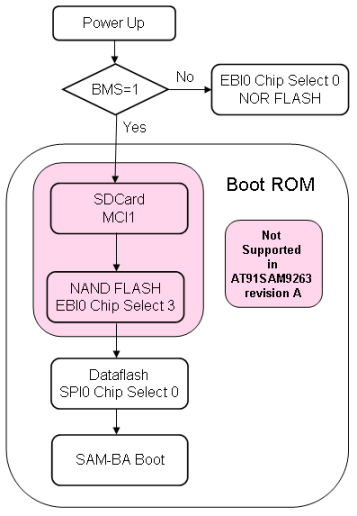
AT91 chips embed a boot ROM code. It is enabled depending on BMS (Boot Mode Select) pin state on reset. This ROM code scans the contents of different media like SPI DATAFLASH, NAND FLASH or SDCARD to determine if a valid application is available then it download the application into SAM9 internal SRAM and run it. To determine if a valid application is present the ROM code checks the eight ARM exception vectors.
AT91 chips은 boot ROM code를 내장한다. 그것은 reset시 BMS(Boot Mode Select) pin 상태에 따라 Enable 여부가 결정된다. 이 ROM code는 SPI DATAFLASH, NAND FLASH 또는 SDCARD와 같은 다른 media의 내용을 scan하고 유효한 application을 사용할 수 있는지 결정한다. 그 다음에 application을 SAM9 internal SRAM으로 그것을 download하고, run한다. 유효한 application이 있는지를 결정하는 것은 ROM code가 8번째 ARM exception vectors를 check하는 것이다.
If no application is available then SAM-BA application is executed. It waits for transactions either on the USB device, or on the DBGU serial port, Then the SAM-BA tool can be used to program FLASH or EEPROM present on your board.
만약 어떤 application도 사용할 수 없다면 SAM-BA applicaiton은 실행된다. 그것은 USB device나 DBGU serial port에서의 transaction을 기다린다.
그 때 SAM-BA tool은 보드에 FLASH, EEPROM에 program 할 수 있게 된다.
For more information on this topic, please check the corresponding SAM product datasheet section Boot Program . You can find a valuable summary in the document named SAM9 Boot Strategies or see the cross matrix below..
이 topic의 추가 정보는 관련 SAM 제품군의 datasheet에 section Boot Program을 확인해라. SAM Boot Strategies라는 document에서 유용한 정보를 찾을 수 있다. 또한 아래의 cross matrix를 통해서도 얻을 수 있다.
ROM Code boot Sequence example
Boot capabilities matrix
Here is :
![]() a summary of the boot feature for each board
a summary of the boot feature for each board
![]() the solution chosen for the Linux4SAM pre-built binaries.
the solution chosen for the Linux4SAM pre-built binaries.
| Product | Boot from DataFlash (SPI0 CS0) |
Boot from DataFlash (SPI0 CS1) |
Boot from NAND Flash |
Boot from SD card |
Boot from NOR Flash |
Boot from Internal Flash 3 |
|---|---|---|---|---|---|---|
| at91rm9200ek | ||||||
| at91sam9260ek | ||||||
| at91sam9xeek | ||||||
| at91sam9261ek | ||||||
| at91sam9263ek | ||||||
| at91sam9rlek | ||||||
| at91sam9g20ek | ||||||
| at91sam9g10ek | ||||||
| at91sam9g45ekes |
Known issues with old AT91Bootstrap
The Dataflash version of AT91Bootstrap (version 1.10 or older) will load a second level bootloader or application from the address 0x8000. Dataflash memories have page size of 1056 bytes, (0x420 hex) and the load address 0x8000 is thus in the middle of a page.
AT91Bootstrap(version 1.10 or older)의 Dataflash version은 second level bootloader 또는 address 0x8000번지부터 application을 load할 것이다.
Dataflash memory는 1056(0x420 hex)bytes page size를 갖는다. 그리고 load address 0x8000은 page의 중간이 된다.
![]() Newer version of AT91Bootstrap (from version 1.11) will load a second level bootloader or application from the address
Newer version of AT91Bootstrap (from version 1.11) will load a second level bootloader or application from the address 0x8400.
새 버전은 second level bootloader 또는 address 0x8400번지부터 application을 load 할 것이다.
Build AT91Bootstrap from sources
Sources and build process are described in the AT91Bootstrap application note page on http://www.atmel.com .
Sources와 build 처리는 AT91Bootstrap application note에 설명되어 있다.
You can also retrieve them from ftp://www.at91.com/pub/at91bootstrap .
ftp://www.at91.com/pub/at91bootstrap 로부터 복구할 수도 있다.
A rewritten version of AT91bootstrap that supports some more options is available as part of the buildroot project at http://buildroot.uclibc.org/
좀 더 많은 option을 제공하는 AT91bootstrap 버전은 http://buildroot.uclibc.org/ 에서 buildroot project의 part로서 사용할 수 있다.
In brief
To compile an AT91Bootstrap project:
- go into the board directory
- select your board by going into the corresponding board directory
- select your media by going into the corresponding directory
- run make
AT91Bootstrap project를 compile 하기 위해
1. boar directory로 간다.
2. 관련 board directory로 가서 board를 선택한다.
3. 관련 directory로 가서 media를 찾는다.
4. make 한다.
Example: To compile a DataFlash boot project for AT91SAM9260-EK board, type the following commands:
예시 : AT91SAM9260-EK board를 위한 DataFlash boot project를 compile하기 위해, 아래의 명령은 친다.
cd board/at91sam9260ek/dataflash
make clean
and
make
or if you want to specify the cross-compiler :
make CROSS_COMPILE=<path_to_cross-compiler/cross-compiler-prefix->
path_to_cross-compiler is only needed if it is not in your PATH.
Usually cross-compiler-prefix- looks like arm-linux- or arm-elf-
Notes
1: If you experience issues with NAND flash accesses,
please refer to the AT91SAM9263-EK Evaluation Board Rev. B User Guide chapter 1.5 NAND Flash Access Issue
2: To workaround the issue with SAM-BA access through USB, a ROM code replacement is located in Dataflash. Please refer to the Errata on AT91SAM9G45 Engineering Sample Devices document
3: Only available on products with embedded Flash
4: On board DataFlash chip
5: Please check at91sam9260 errata # 44.2.1.1
6: Supported on SAM9261 rev B and onward
7: Removable DataFlash card
8: Supported on SAM9263 rev B and onward
'[C-03] AT91SAM9260' 카테고리의 다른 글
| Linux4SAM - Linux Kernel (0) | 2009.11.16 |
|---|---|
| Linux4SAM - U-Boot (0) | 2009.11.15 |
| Linux4SAM - Software Tools (0) | 2009.11.15 |
| Linux4SAM - Getting Started (0) | 2009.11.14 |
| AT91SAM Community (0) | 2009.11.10 |


