U-Boot
Introduction
Das U-Boot - the Universal Boot Loader wiki website is the main entry point for this bootloader / debugging tool available on several processors. It is of course available for AT91 ARM processors.
Das U-Boot - the Universal Boot Loader wiki website는 여러 processors에서 사용할 수 있는 bootloader/debugging tool을 위한 main entry point이다. AT91 ARM processor에서도 사용 가능하다.
U-boot documentation is very rich ; in addition to the official u-boot website, several others are dealing with u-boot getting started or configuration. An article from http://www.linuxdevices.com also gives a good introduction to u-boot. Note however that a detailed documentation is simply available in the source code package as the README file. Thematic documentation is also available in the doc/ directory.
U-boot은 매우 풍부한 문서를 제공하며, 게다가 공식 u-boot website, 여러개의 자료는 u-boot getting started 또는 confiuration과 관계를 가지고 있다.
http://www.linuxdevices.com 로부터의 기사에는 u-boot을 좋게 소개하고 있다. 그러나 세부적인 문서화는 README 파일에서 처럼 source code package에서 간단하게 사용할 수 있다. 주제화된 문서화 또한 doc/ directory에서 사용할 수 있다.
U-boot takes place in the Linux demo as a second stage bootloader. It is responsible of configuring main interfaces and launching a Linux system. Note however that it is possible to avoid this step and to directly boot Linux from AT91Bootstrap, in a production phase for instance.
U-boot은 Linux demo에서 second stage bootloader로 동작한다. 그것은 main interface의 configuring과 Linux system의 launching을 책임지고 있다. 그러나 이러한 과정을 거치지 않고 직접 AT91Bootstrap로부터 Linux를 boot할 수 있다.
The u-boot Application note & flash prog on http://www.atmel.com describes the use of u-boot with the AT91rm9200 chip. The using of u-boot with SAM9 products is a bit different as AT91Bootstrap and the SAM-BA ISP are introduced for these devices.
http://www.atmel.com의 u-boot Application note & flash prog 는 AT91rm9200 chip에서 u-boot의 사용방법에 대하여 설명하고 있다. SAM9 제품군에서 u-boot을 사용하는 것은 AT91Bootstrap에 약간의 차이가 있고 SAMBA ISP는 이러한 devices를 위해 소개 되었다.
U-boot pre-built images
A revision of u-boot for AT91 boards is built from the official u-boot website and a patch against this revision of u-boot.
This patch is regularly updated.
AT91 boards를 위한 u-boot의 revision은 공식적으로 u-boot website로부터 build 되었고 u-boot의 revision별로 patch도 build 되었다. 이 patch는 정기적으로 updated 되었다.
U-boot environment
The u-boot environment is a little read/write persistent space that stores variables needed by the bootloader to configure itself properly and to adapt to its environment (network configuration, boot arguments, storage location, etc.). It is located in the same media that it has booted from. Check Boot capabilities matrix to know where the u-boot environment is located for the pre-built binary.
u-boot environment 은 조그마한 real/write 가능한 지속적인 공간이다. 이것은 그 자체를 알맞게 configure하고 그것의 환경(network configuration, boot arguments, storage location, etc.)에 적응하기 위해 bootloader에 의해 필요한 변수를 저장하는 공간이다. 그것은 booted되는 같은 media에 위치된다. pre-built binary를 위해 어디에 u-boot environment이 위치하는지 알기 위해 Boot capabilities matrix를 확인해라.
U-boot 1.3.4 experimental binaries
DataFlash
NandFlash
Load u-boot on AT91 boards
This section describes How to load u-boot into the boot media with SAM-BA.
이 section은 SAM-BA를 가지고 u-boot을 boot media에 load에 load하는 방법에 대하여 설명한다.
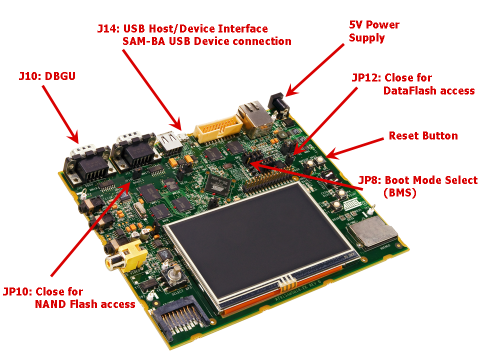
- Connect the USB Device Interface to your host machine using the USB Device Cable
- USB Device Cable을 이용하여 host machine에 USB Device Interface를 연결한다.
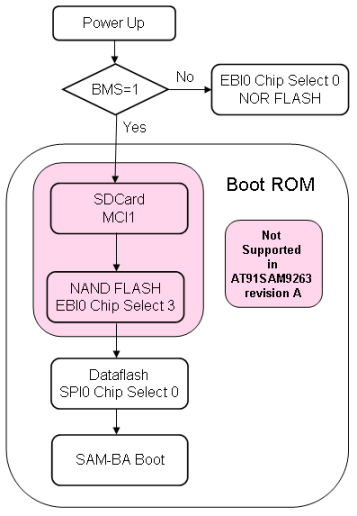
- Make sure that the chip can execute the bootROM monitor SAM-BA-boot :
- chip이 bootROM monitor SAM-BA-boot를 실행할 수 있는지 확인한다 :
| AT91SAM9260-EK |
AT91SAM9261-EK |
AT91SAM9263-EK (RevA) |
- J7 must be opened (BMS=1) to boot from the on-chip Boot ROM
- follow the AT91SAM9260EKSamBaRecovery recovery method, if needed
- power up the board
- verify that the USB connection is established (ATMEL AT91xxxxx Test Board appears in taskbar notification area)
|
- J4 must be opened (BMS=1) to boot from the on-chip Boot ROM
- remove DataFlash Jumper (J21)
- power up the board
- verify that the USB connection is established (ATMEL AT91xxxxx Test Board appears in taskbar notification area)
- plug DataFlash Jumper (J21) back in position 1-2
|
- J5-6 must be opened (BMS=1) to boot from the on-chip Boot ROM
- remove DataFlash Card (J9)
- power up the board
- verify that the USB connection is established (ATMEL AT91xxxxx Test Board appears in taskbar notification area)
- reinsert the DataFlash Card in J9
|
| AT91SAM9XE-EK |
AT91SAM9RL-EK |
AT91SAM9263-EK (RevB) |
- erase the content of the internal FLASH by putting the J7 jumper in position 1-2
- power up the board
- verify that the USB connection is established (ATMEL AT91xxxxx Test Board appears in taskbar notification area)
- open now J7 (or put in position 2-3), to boot in normal operating mode
|
- J11 must be on 1-2 position (BMS=1) to boot from the on-chip Boot ROM
- remove DataFlash and NAND Flash Jumpers (J12 & J13)
- power up the board
- verify that the USB connection is established (ATMEL AT91xxxxx Test Board appears in taskbar notification area)
- close DataFlash and NAND Flash Jumpers (J12 & J13)
|
- J5-6 must be opened (BMS=1) to boot from the on-chip Boot ROM
- remove DataFlash Card (J9)
- remove NAND Flash Jumpers (J29)
- power up the board
- verify that the USB connection is established (ATMEL AT91xxxxx Test Board appears in taskbar notification area)
- reinsert the DataFlash Card in J9 (only for DataFlash demo)
- close NAND Flash Jumper (J29) 1
|
| AT91SAMG20-EK |
AT91SAMG10-EK |
AT91SAM9G45-EKES |
- J7 must be opened (BMS=1) to boot from the on-chip Boot ROM
- remove DataFlash and NAND Flash Jumpers (J33 & J34)
- power up the board
- verify that the USB connection is established (ATMEL AT91xxxxx Test Board appears in taskbar notification area)
- close DataFlash and NAND Flash Jumpers (J33 & J34)
|
- J4 must be opened (BMS=1) to boot from the on-chip Boot ROM
- remove DataFlash and NAND Flash Jumpers (J21 & J24)
- power up the board
- verify that the USB connection is established (ATMEL AT91xxxxx Test Board appears in taskbar notification area)
- close DataFlash (J21) back in position 1-2
- close NAND Flash Jumper (J24)
|
- Check and conform to the Default Jumpers Settings
- First of all, be sure that the ROM code replacement is located in Dataflash to workaround the issue with SAM-BA access through USB. Please refer to the Errata on AT91SAM9G45 Engineering Sample Devices document
- JP8 must be opened (BMS=1) to boot from the on-chip Boot ROM
- remove NAND Flash Jumper (JP10)
- power up the board
- verify that the USB connection is established (ATMEL AT91xxxxx Test Board appears in taskbar notification area)
- close NAND Flash Jumper (JP10)
|
- Start SAM-BA GUI Application
- SAM-BA GUI application을 시작한다.
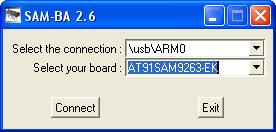
- Select the the board in the drop-down menu and choose the USB Connection
- drop-down menu에서 board를 선택하고 USB connection을 선택한다.

- Eventually plug back a jumper to access the media on which u-boot must be loaded to
- 마지막으로 u-boot이 loaded 되어야만 하는 media에 access하기 위해 jumper 를 plug back 한다.
- In the main SAM-BA window :
- main SAM-BA window에서 :
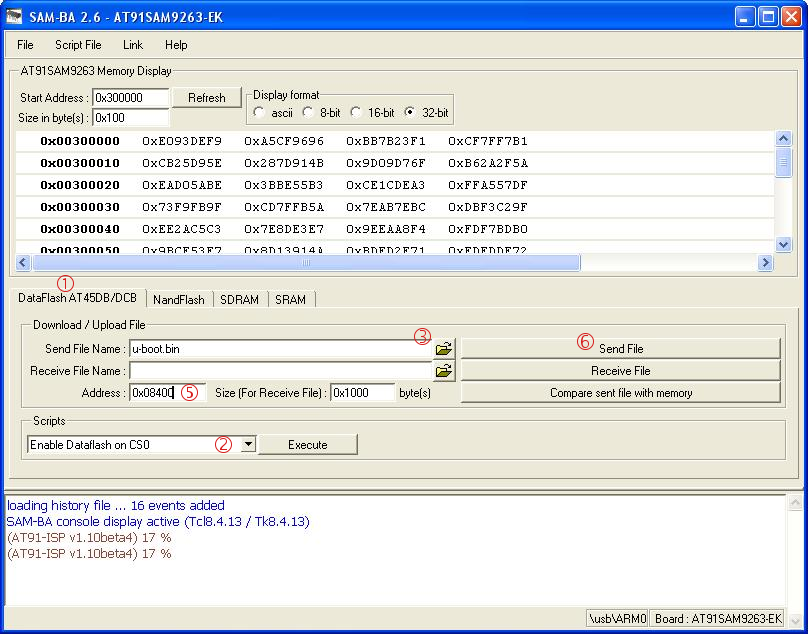
- Choose the proper media tab (DataFlash, NandFlash, etc.) in the SAM-BA GUI interface
- Initialize the media choosing the Enable action in the Scripts rolling menu and press Execute
- Press on Send File Name Browse button
- Choose u-boot.bin binary file and press Open
- Enter the proper address on media in the Address text field. You can find a media map for each product in GettingStarted#Linux4SAM_DataFlash_demo_Memory and GettingStarted#Linux4SAM_NandFlash_demo_Memory
- Press Send File button
- On AT91SAM9260-EK or AT91SAM9XE-EK, If you have erased the booting media, do not forget to replace AT91Bootstrap in it
- Close SAM-BA, remove the USB cable
1. SAM-BA GUI interface에 알맞은 media tab(DataFlash, NandFlash, etc.) 을 선택한다.
2. Scripts rolling menu에서 Enable action 선택하여 media를 초기화하고 Execute를 누른다.
3. Send File Name Browse button을 누른다.
4. u-boot.bin binary 파일을 선택하고 Open을 누른다.
5. Address text field에서 media의 알맞은 address를 넣는다. GettingStarted#Linux4SAM_DataFlash_demo_Memory 과GettingStarted#Linux4SAM_NandFlash_demo_Memory 에서 각 product의 media map 을 찾을 수 있다.
6. Send File button 을 누른다.
7. AT91SAM9260-EK 또는 AT91SAM9XE-EK에서, booting media를 erased했다면, AT91Bootstrap으로 booting media를 대체해야만 한다.
8. SAM-BA를 close하고 USB 케이블을 제거한다.
Ok, now you must have a running u-boot flashed on your board. To check, you can have a look at the DBGU serial interface once you have reset the board.
보드에서 flashed 된 u-boot을 running해야 한다. 보드를 reset했을 때 DBGU serial interface통해 확인 할 수 있다.
Use u-boot
Using a terminal software on your host system, you can connect to u-boot through the DBGU serial interface.
host system에서 terminal software를 사용함으로써, DBGU serial interface를 통해 u-boot가 연결할 수 있다.
Serial communication parameters 115200 8-N-1 :
| Baud rate |
115200 |
| Data |
8 bits |
| Parity |
None |
| Stop |
1 bit |
| Flow control |
None |
U-boot Main Commands
setenv this command is used to set variables
setenv 이 명령은 variables을 설정할 때 사용된다.
saveenv this command saves variables previously set in the environment permanent storage space
saveenv 이 명령은 영속적인 저장공간의 환경에서 미리 설정한 variables를 저장한다.
printenv this command print the current variables
printenv 이 명령은 현재 variables을 print한다.
The help command show a brief summary of the built-in commands of u-boot. Here is a selection of useful commands :
help 명령은 u-boot의 built-in command를 간략하게 보여준다. 사용할 명령을 선택한다.
U-Boot> help
?       - alias for 'help'
boot    - boot default, i.e., run 'bootcmd'
bootm   - boot application image from memory
cp      - memory copy
erase   - erase FLASH memory
flinfo  - print FLASH memory information
go      - start application at address 'addr'
help    - print online help
md      - memory display
mm      - memory modify (auto-incrementing)
nand    - NAND sub-system
printenv- print environment variables
protect - enable or disable FLASH write protection
run     - run commands in an environment variable
saveenv - save environment variables to persistent storage
setenv  - set environment variables
tftpboot- boot image via network using TFTP protocol
version - print monitor version
U-Boot>
Refer to the u-boot manual page for u-boot command line interface.
u-boot command line interface를 위해 u-boot manual page를 참조한다.
U-boot script capability
You can create script or complex variables, which prevents you to type commands. Here is a summary of several variables built to make a network loading of linux easier :
type commands를 방지하는 script나 복잡한 variables를 생성할 수 있다. 아래에 더 쉽게 linux를 network loading하게 built하는 여러 variable에 대해 간략하게 설명하고 있다.
setenv boot_addr 0x21400000
setenv linux 'tftp $(boot_addr) linux-2.6.x.img'
setenv ramdisk_addr 0x21100000
setenv ramdisk 'tftp $(ramdisk_addr) sam9-ramdisk.gz'
setenv go 'run linux; run ramdisk; bootm $(boot_addr)'
saveenv
The setenv linux 'tftp $(boot_addr) linux-2.6.x.img' line is equivalent of typing tftp 0x21400000 linux-2.6.x.img but combined with others and stored in flash, it allows you to save time, and automate. For executing a Linux kernel bootup, using this snippet, simply type run go
setenv linux 'tftp $(boot_addr) linux-2.6.x.img' line은 tftp 0x21400000 linux-2.6.x.img로 치는 것과 동일하나 다른것과 결합하고 flash에 저장되며 time을 save하고 자동으로 작업을 수행한다. Linux kernel bootup을 실행하기 위해 간단하게 run go라고 치면 된다.
Boot pre-defined variables and command:
bootcmd when set, this variable content is executed automatically after the boot delay. It enables the u-boot autoboot mode
bootcmd set하면, 이 variable의 내용은 boot delay 후에 자동으로 실행된다. u-boot autoboot mode를 enable한다.
bootargs this variable it used as an exchange area to pass information to the main application started by u-boot (Linux kernel for instance)
bootargs u-boot에 의해 시작되는 main application으로 information을 전달하는 exchange area로서 사용되는 variable.
bootm this command executes an application generated by the mkimage tool
bootm 이 명령은 mkimage tool에 의해 발생되는 application을 실행한다.
Load Linux with u-boot on AT91 boards
This section describes the loading of a Linux kernel and it root file system. Keep in mind useful u-boot commands to setup your u-boot behavior.
이 section은 Linux kernel과 root file system의 loading을 설명한다. u-boot을 setup하기 위해 useful u-boot commands에 유의하라.
Preparing linux image
U-Boot does not support normal linux kernel images like zImage or Image (arch/arm/boot/), you have to create an uImage file with the mkimage tool which encapsulates kernel image with header information, CRC32 checksum, etc.
U-boot은 zImage나 Imgae와 같은 일반 linux kernel image를 제공하지는 않는다. header iinformation, CRC32 cheksum 등과 함께 kernel image를 encapsulates하는 mkimage tool을 이용하여 uImage를 생성해야 한다.
mkimage comes in source code with U-Boot distribution and it is built during U-Boot compilation (u-boot-source-dir/tools/mkimage), we provide also pre-built static version.
mkimage는 U-Boot 배포판에 source code를 가지고 있고 U-Boot compilation(u-boot-source-dir/tools/mkimage) 동안 built된다. 또한 pre-built static version도 제공한다.
See U-Boot README file for more information.
좀 더 많은 정보는 README 파일을 확인해라.
Command to generate an uncompressed uImage file 2 :
uncompressed uImage file을 생성하는 명령은 다음과 같다.
mkimage -A arm -O linux -C none -T kernel -a 20008000 -e 20008000 -n linux-2.6 -d arch/arm/boot/Image uImage
Commands to generate a compressed uImage file 2 :
compressed uImage file을 생성하는 명령은 다음과 같다.
mkimage -A arm -O linux -C none -T kernel -a 20008000 -e 20008000 -n linux-2.6 -d arch/arm/boot/zImage uImage
Loading through network
On a development system, it is useful to get the kernel and root file system through the network. U-boot provides support for loading binaries from a remote host on the network using the TFTP protocol.
개발 시스템에서, network를 통해 kernel과 root file system을 얻는 것은 유용한 작업이다. U-boot은 TFTP protocol을 이용하여 network에서 remote host로부터 binary를 loading 할 수 있다.
To manage to use TFTP with u-boot, you will have to configure a TFTP server on your host machine. Check your distribution manual or Internet resources to configure a Linux or Windows TFTP server on your host:
u-boot으로 TFTP 사용을 관리하기 위해서는 , host machine에 TFTP server가 configure 되어 있어야 한다. host에 TFTP server를 configure 하기 위해 배포 메뉴얼 또는 internet resource를 을 확인해라.
On the u-boot side, you will have to setup the networking parameters:
u-boot side에서 networking parameters를 setup해야 한다.
- setup an Ethernet address (MAC address)
Check this u-boot network BuildRootFAQ entry to choose a proper MAC address.
setenv ethaddr 3e:36:65:ba:6f:be
- setup IP parameters
- the board ip address
setenv ipaddr 10.159.245.180
- the server ip address where the TFTP server is running
setenv serverip 10.159.245.186
- saving Environment to flash
saveenv
- if Ethernet Phy has not been detected during former bootup, reset the board to reload u-boot : the Ethernet address and Phy initialization shall be ok, now
- download the Linux uImage and the root file system to a ram location using the u-boot
tftp command (Cf. U-Boot script capability chapter).
- launch Linux issuing a
bootm or boot command.
1. Ethernet address(MAC address)를 set-up한다.
알맞은 MAC address 선택하기 위해 this u-boot network BuildRootFAQ entry 를 확인해라.
setenv ethaddr 3e:36:65:ba:6f:be
2. IP parameter를 setup한다.
- 보드 IP address
setenv ipaddr 10.159.245.180
- TFTP server가 running하는 server IP
setenv serverip 10.159.245.186
3. flash하기 위해 environment를 저장한다.
saveenv
4. bootup 전에 Ethernet Phy가 감지되지 않으면, u-boot을 reload하기 위해 board를 reset한다. Ethernet address와 Phy 초기화가
ok 될 것이다.
5. u-boot tftp command를 이용하여 Linux와 root file system을 ram 위치로 download한다.
6. bootm또는 boot 명령을 쳐서 Linux를 launch한다.
Build u-boot from sources
To build the binary found above, you will have to go through the following steps.
위에서 찾은 binary를 build하기 위해 다음 과정을 거쳐야 한다.
Getting u-boot sources
Dedicated page on u-boot wiki : http://www.denx.de/wiki/U-Boot/SourceCode
u-boot wiki page : http://www.denx.de/wiki/U-Boot/SourceCode
To get the u-boot bootloader sources for AT91 product you have to go through the following steps (note that x.x.x and y.y must be replace by the corresponding revision numbers) :
AT91 제품군의 u-boot bootloader source 를 얻기 위해, 다음 단계를 거쳐야 한다.(note that x.x.x and y.y must be replace by the corresponding revision numbers) :
- download the u-boot sources from the link in the second below and extract it:
- 아래 두번째 link로부터 u-boot source를 download하고 그것을 extract한다.
wget ftp://ftp.denx.de/pub/u-boot/u-boot-x.x.x.tar.bz2
tar xvjf u-boot-x.x.x.tar.bz2
cd u-boot-x.x.x
- take the corresponding AT91 u-boot patch set (check third column):
- 관련 AT91 u-boot patch set을 받는다.
wget http://www.at91.com/linux4sam/pub/Linux4SAM/U-Boot/u-boot-x.x.x-exp.diff
# or, depending on u-boot revision, check the FTP directory:
wget ftp://www.at91.com/pub/uboot/u-boot-x.x.x-exp/u-boot-x.x.x-exp.diff
- apply it on top of the original u-boot:
- original u-boot에 덮어쓴다.(patch한다)
cat u-boot-x.x.x-exp.diff | patch -p1
You will have a fresh source copy of the AT91 u-boot.
AT91 u-boot의 fresh source copy를 갖을 수 있다.
U-boot 1.3.4 experimental sources
Choosing where the u-boot environment resides
Above, we talked about the location of the u-boot environment. Here is a way to modify it to your needs :
위에서 location of the u-boot environment에 대하여 이야기 했다. 여기서는 필요에 따라 location을 modify하는 방법에 대해 알아본다.
 With newer revisions of u-boot (u-boot-1.1.5_atmel_1.7.diff patch, u-boot-1.3.4 and later) you can choose location of environment variables at configuration step. With newer revisions of u-boot (u-boot-1.1.5_atmel_1.7.diff patch, u-boot-1.3.4 and later) you can choose location of environment variables at configuration step.
u-boot의 새 revision(u-boot-1.1.5_atmel_1.7.diff patch, u-boot-1.3.4 and later)을 가지고 configuration 단계에서 환경변수의 위치를 선택할 수 있다.
To put environment variables in dataflash (default):
dataflash에 환경변수를 위치시키기 위해 다음과 같이 한다.
make at91sam9xxxek_dataflash_config
or
make at91sam9xxxek_dataflash_cs0_config
To put environment variables in nandflash:
nandflash에 환경변수를 넣기 위해 다음과 같이 한다.
make at91sam9xxxek_nandflash_config
Please go to the top-level Makefile or read the README.at91 file in the doc directory of u-boot to find the exact target when invoking make.
make를 invoking할때 정확한 target을 찾기 위해 top-level Makefile로 가거나 u-boot의 doc directory에서 README.at91 파일을 read한다.
With older revisions, the environment configuration resides in a header file ; you just have to define or undef pre-compilation variables:
older revision은 environment configuration이 header file에 존재한다. 컴파일 전에 define 또는 undef 만 하면 된다.
| Product |
Config file |
Piece of code involved |
| AT91rm9200ek |
include/configs/at91rm9200ek.h |
#undef  CFG_ENV_IS_IN_DATAFLASH

#ifdef CFG_ENV_IS_IN_DATAFLASH
[..]
#else
#define CFG_ENV_IS_IN_FLASH  1
[..]
#endif |
| AT91sam9260ek |
include/configs/at91sam9260ek.h |
#define CFG_ENV_IS_IN_DATAFLASH  1
#undef CFG_ENV_IS_IN_NAND |
| AT91sam9261ek |
include/configs/at91sam9261ek.h |
#define CFG_ENV_IS_IN_DATAFLASH 1 |
| AT91sam9263ek |
include/configs/at91sam9260ek.h |
#define CFG_ENV_IS_IN_DATAFLASH 1 |
Note that CFG_ENV_IS_IN_FLASH means environment in NOR FLASH. This option is not supported "out of the box" for all products but certainly can be implemented.
CFG_ENV_IS_IN_FLASH는 NOR FLASH에서의 environment를 의미한다. 이 option은 모든 제품군을 위해 제공된 "out of the box" 는 아니지만 확실히 실험될 수 있다.
Additional information about those variables are availlable in the u-boot README (search "- CFG_ENV_IS_IN_FLASH").
이러한 variables에 대한 추가적인 정보는 u-boot README에서 사용될 수 있다(search "- CFG_ENV_IS_IN_FLASH").
Cross-compiling u-boot
Once the AT91 u-boot sources available, cross-compile u-boot is made in two steps : configuration and compiling. Check the Configuration chapter in u-boot reference manual.
AT91 u-boot sources를 사용하 때, cross-compile은 두 단계로 이루어 진다. : configuration과 compiling이다. u-boot reference manual의 Configuration chapter를 확인해라.
Note that both arm-elf- and arm-linux- ARM GCC cross-compiler types are suitable for u-boot building.
arm-elf- 와 arm-linux- ARM GCC cross-compiler types 모두 u-boot building을 위해 적합하다.
 Some newer version of Some newer version of make produce errors while compiling old u-boot 1.1.5.
While using u-boot 1.1.5, we advice you to run an older make executable: check the SoftwareTools page.
어떤 새로운 versiondms old u-boot 1.1.5를 컴파일하는 동안 error가 발생한다.
u-boot 1.1.5를 사용할 때 older make executable를 run하는 것은 권장한다. SoftwareTools page를 확인해라.
Here are the building steps for the AT91sam9263ek board:
AT91sam9263ek board를 building 하는 단계는 다음과 같다.
make distclean
make at91sam9263ek_config
make CROSS_COMPILE=<path_to_cross-compiler/cross-compiler-prefix->
path_to_cross-compiler is only needed if it is not in your PATH.
Usually cross-compiler-prefix- looks like arm-linux- or arm-elf-
The result of these operations is a fresh u-boot binary called u-boot.bin corresponding to the binary ELF file u-boot.
이 동작의 결과는 u-boot binary ELF file과 관련된 u-boot.bin으로 불리는 새로 생성된 u-boot binary이다.
u-boot.bin is the file you should store on the board - u-boot.bin은 보드에 저장할 file이다.
u-boot is the ELF format binary file you may use to debug u-boot through a JTag link for instance. - u-boot은 JTAG link를 통해 u-boot을 debug하기 위해 사용할 수 있는 ELF format binary file이다.
Notes
1: If you experience issues with NAND flash accesses,
please refer to the AT91SAM9263-EK Evaluation Board Rev. B User Guide chapter 1.5 NAND Flash Access Issue
만약 실험이 NAND flash access로 이루어진다면,
AT91SAM9263-EK Evaluation Board Rev. B User Guide chapter 1.5 NAND Flash Access Issue 를 참조한다.
2: for at91sam9g45 family: use proper location for RAM: 0x70000000 instead of 0x20000000
at91sam9g45 family에서 RAM의 위치는 0x20000000 대신에 0x70000000을 사용한다.
|
|
|


